
This option is sometimes useful if the application you are targeting employs a thick client component that runs outside of the browser, or a browser plugin that makes its own HTTP requests outside of the browser’s framework. Often, these clients don’t support HTTP proxies, or don’t provide an easy way to configure them to use one.
I have made a draw to in order to have a general vision:
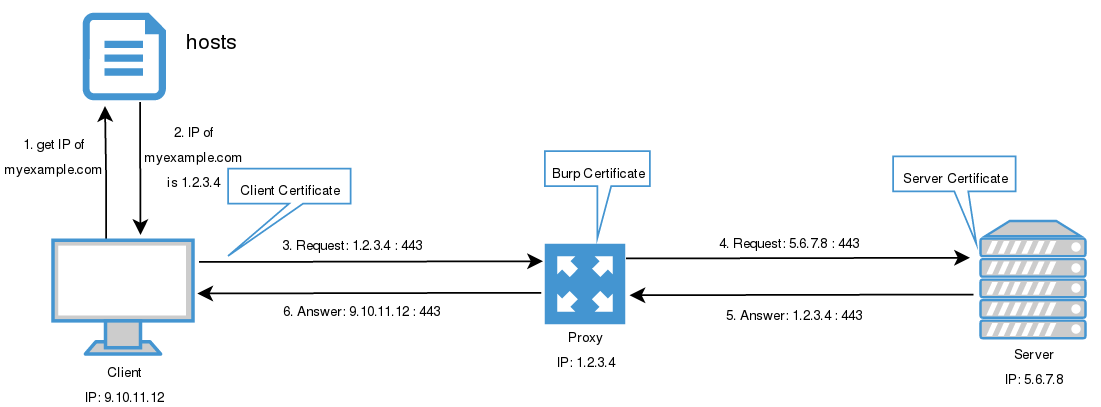
- Client asks for the IP of myexample.com
- From
hostsfile it takes the IP is 1.2.3.4 - Client makes the requests to 1.2.3.4 with port 443
- Proxy makes the requests to the server (redirecting the traffic)
- Server answers to the proxy
- Proxy answers to the client
Requests
However, you must have take into account the following:
When using plain HTTP, a proxy-style request looks like this:
GET http://myexample.com/foo.php HTTP/1.1
Host: myexample.com
Whereas the corresponding to the invisible proxy request looks like this:
GET /foo.php HTTP/1.1
Host: myexample.com
Normally, web proxies need to receive the full URL in the first line of the request in order to determine which destination host to forward the request to (they do not look at the Host header to determine the destination). If invisible proxying is enabled, when Burp receives any non-proxy-style requests, it will parse out the contents of the Host header, and use that as the destination host for that request.
When using HTTPS with a proxy, clients send a CONNECT request identifying the destination host they wish to connect to, and then perform SSL negotiation. However, non-proxy-aware clients will proceed directly to SSL negotiation, believing they are communicating directly with the destination host. If invisible proxying is enabled, Burp will tolerate direct negotiation of SSL by the client, and again will parse out the contents of the Host header from the decrypted request.
Edit hosts
In order to redirect the traffic to Burp proxy, you have to edit hosts file:
- Linux: /etc/hosts
- Windows: C:Windowssystem32driversetchosts
And we add the following entry:
1.2.3.4 myexample.com
This change will make that when the machine wants to resolve the host myexample.com, instead of asking it to the DNS, it will resolve as 1.2.3.4. Redirecting all the traffic of example.org to the localhost.
Configure Burp
Once the client is configured, you need to configure the proxy. With Burp you have to change the following options
Proxy -> Options -> Proxy Listeners -> Edit
- Binding (where the proxy will be listening to)
- Binding to port: you need to specify which port the proxy will listen to. For example, if the client makes the request to https://myexample.com, the proxy should be listening in the port 443.
- Binding to address: it is recommended to use the option “All Interficies”.
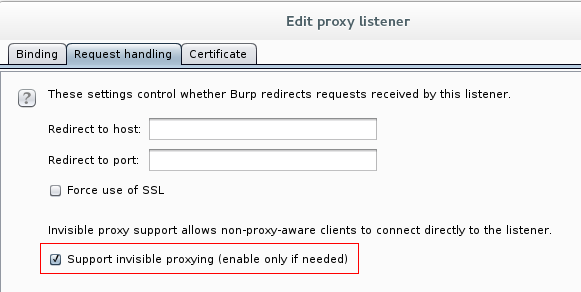
- Request handling (where the proxy will send the traffic)
- Redirect to host: what address Burp will send the traffic to. So, if you want the server to answer the requests you are makeing, you should write here the IP address of the host myexample.com.
- Redirect to port: the port the server will be waiting the requests from the client. Usually it will be 443 (if https) or 80 (if http).
- Support invisible proxying: you have to check this check-box to make Burp invisible.
Type of certificates
Non-proxy-aware clients negotiate SSL directly with the listener, without first sending a CONNECT request identifying the destination host that the client is seeking to contact. Many clients, including browsers, support the “server_name” extension in the Client Hello message, which identifies the destination host that the client wishes to negotiate with. If this extension is present, Burp uses it to generate a certificate for that host in the normal way. However, if the extension is not present in the Client Hello message, Burp will fail over to using a static self-signed certificate instead.
Burp gives four options:
- Use a self-signed certificate
- Generate CA-signed per-host certificates: by default Burp uses this certificate. It might be installed into the browser.
- Generate a CA-signet certificate with specific hostname: needed in the invisible proxy.
- Use a custom certificate: if you have the certificate and the password, you can use the certificate of the client instead of the one Burp creates.
More than one host
All the strategy mentioned before works if you are intercepting and redirecting only one host. However, it will not work if more than one host are involved.
In order to redirect more than one host to the proxy, Burp has an option called “hostname resolution” under the tab “Project options”. Each hostname resolution rule specifies a hostname, and the IP address that should be associated with that hostname. Rules can be individually enabled or disabled.
It will override the DNS resolution provided by your computer.
Once you have the redirections configured, you need to configure the forwarding options: if different requests should be forwarded to different hosts, then you will need to use multiple Proxy listeners:
- Create a separate virtual network interface for each destination host. (Most operating systems let you create additional virtual interfaces with loopback-like properties. Alternatively, this is possible in virtualized environments.)
- Create a separate Proxy listener for each interface (or two listeners if HTTP and HTTPS are both in use).
- Using your hosts file, redirect each destination hostname to a different network interface (i.e., to a different listener).
- Configure the listener on each interface to redirect all traffic to the IP address of the host whose traffic was redirected to it.


近期评论