
Goal
- 커맨드 패턴의 개념을 이해한다.
- 예시를 통해 커맨드 패턴을 이해한다.
커맨드 패턴이란
- 실행될 기능을 캡슐화함으로써 주어진 여러 기능을 실행할 수 있는 재사용성이 높은 클래스를 설계하는 패턴
- 즉, 이벤트가 발생했을 때 실행될 기능이 다양하면서도 변경이 필요한 경우에 이벤트를 발생시키는 클래스를 변경하지 않고 재사용하고자 할 때 유용하다.
- ‘행위(Behavioral) 패턴’의 하나 (아래 참고)
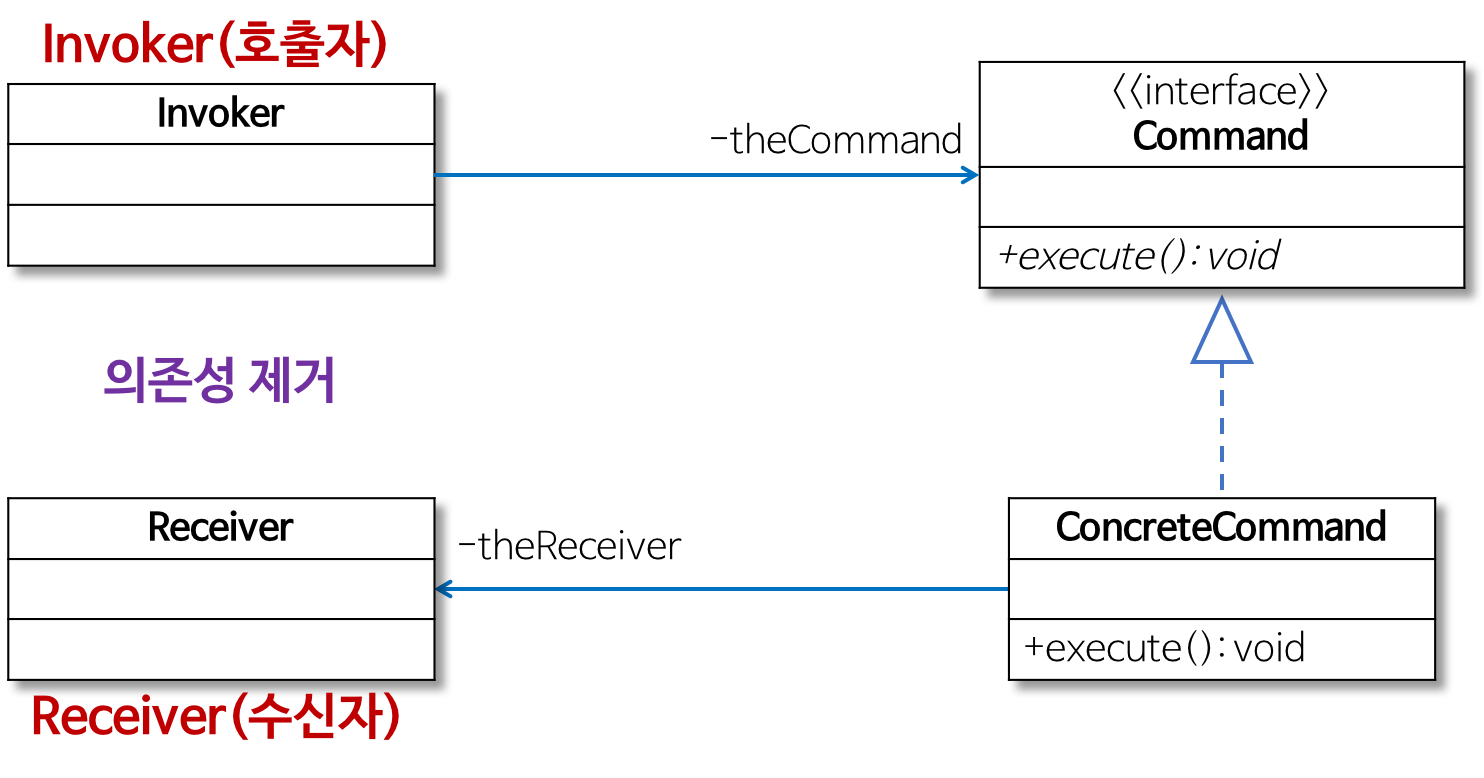
- 실행될 기능을 캡슐화함으로써 기능의 실행을 요구하는 호출자(Invoker) 클래스와 실제 기능을 실행하는 수신자(Receiver) 클래스 사이의 의존성을 제거한다.
- 따라서 실행될 기능의 변경에도 호출자 클래스를 수정 없이 그대로 사용 할 수 있도록 해준다.
- 역할이 수행하는 작업
- Command
- 실행될 기능에 대한 인터페이스
- 실행될 기능을 execute 메서드로 선언함
- ConcreteCommand
- 실제로 실행되는 기능을 구현
- 즉, Command라는 인터페이스를 구현함
- Invoker
- 기능의 실행을 요청하는 호출자 클래스
- Receiver
- ConcreteCommand에서 execute 메서드를 구현할 때 필요한 클래스
- 즉, ConcreteCommand의 기능을 실행하기 위해 사용하는 수신자 클래스
- Command
참고
- 행위(Behavioral) 패턴
- 객체나 클래스 사이의 알고리즘이나 책임 분배에 관련된 패턴
- 한 객체가 혼자 수행할 수 없는 작업을 여러 개의 객체로 어떻게 분배하는지, 또 그렇게 하면서도 객체 사이의 결합도를 최소화하는 것에 중점을 둔다.
예시
만능 버튼 만들기

- 버튼이 눌리면 램프의 불이 켜지는 프로그램
public class Lamp {
public void turnOn(){ System.out.println("Lamp On"); }
}
public class Button {
private Lamp theLamp;
public Button(Lamp theLamp) { this.theLamp = theLamp; }
public void pressed() { theLamp.turnOn(); }
}
public class Client { public static void main(String[] args) { Lamp lamp = new Lamp(); Button lampButton = new Button(lamp); lampButton.pressed(); } } - Button 클래스의 생성자를 이용해 불을 켤 Lamp 객체를 전달한다.
- Buttom 클래스의 pressed()가 호출되면 생성자를 통해 전달받은 Lamp 객체의 turnOn()를 호출해 불을 켠다.
문제점
- 버튼을 눌렀을 때 다른 기능을 실행하는 경우
- 버튼을 눌렀을 때 알람이 시작되게 하려면?
public class Alarm {
  public void start(){ System.out.println("Alarming"); }
}
public class Button {
  private Alarm theAlarm;
  public Button(Alarm theAlarm) { this.theAlarm = theAlarm; }
  public void pressed() { theAlarm.start(); }
}
public class Client { public static void main(String[] args) { Alarm alarm = new Alarm(); Button alarmButton = new Button(alarm); alarmButton.pressed(); } } - 새로운 기능으로 변경하려고 기존 코드(Button 클래스)의 내용을 수정해야 하므로 OCP에 위배된다.
- Button 클래스의 pressed() 전체를 변경해야 한다.
- 버튼을 눌렀을 때 알람이 시작되게 하려면?
- 버튼을 누르는 동작에 따라 다른 기능을 실행하는 경우
- 버튼을 처음 눌렀을 때는 램프를 켜고, 두 번째 눌렀을 때는 알람을 동작하게 하려면?
enum Mode { LAMP, ALARM }; // Button 클래스의 코드를 수정 public class Button { private Lamp theLamp; private Alarm theAlarm; private Mode theMode; // 생성자에서 버튼을 눌렀을 때 필요한 기능을 인지로 받는다. public Button(Lamp theLamp, Alarm theAlarm) { this.theLamp = theLamp; this.theAlarm = theAlarm; } // 램프 모드 또는 알람 모드를 설정 public void setMode(Mode mode) { this.theMode = mode; } // 설정된 모드에 따라 램프를 켜거나 알람을 울림 public void pressed() { switch(theMode) { case LAMP: theLamp.turnOn(); break; case ALARM: theAlarm.start(); break; } } } - 필요한 기능을 새로 추가할 때마다 Button 클래스의 코드를 수정해야 하므로 재사용하기 어렵다.
- 버튼을 처음 눌렀을 때는 램프를 켜고, 두 번째 눌렀을 때는 알람을 동작하게 하려면?
해결책
문제를 해결하기 위해서는 구체적인 기능을 직접 구현하는 대신 실행될 기능을 캡슐화해야 한다.
- 즉, Button 클래스의 pressed 메서드에서 구체적인 기능(램프 켜기, 알람 동작 등)을 직접 구현하는 대신 버튼을 눌렀을 때 실행될 기능을 Button 클래스 외부에서 제공받아 캡슐화해 pressed 메서드에서 호출한다.
- 이를 통해 Button 클래스 코드를 수정하지 않고 그대로 사용할 수 있다.
- Button 클래스는 미리 약속된 Command 인터페이스의 execute 메서드를 호출한다.
- 램프를 켜는 경우에는 theLamp.turnOn 메서드를 호출하고
- 알람이 동작하는 경우에는 theAlarm.start 메서드를 호출하도록 pressed 메서드를 수정한다.
- LampOnCommand 클래스에서는 Command 인터페이스의 execute 메서드를 구현해 Lamp 클래스의 turnOn 메서드(램프 켜는 기능)를 호출한다.
- 마찬가지로 AlarmStartCommand 클래스는 Command 인터페이스의 execute 메서드를 구현해 Alarm 클래스의 start 메서드(알람이 울리는 기능)를 호출한다.
- Button 클래스는 미리 약속된 Command 인터페이스의 execute 메서드를 호출한다.
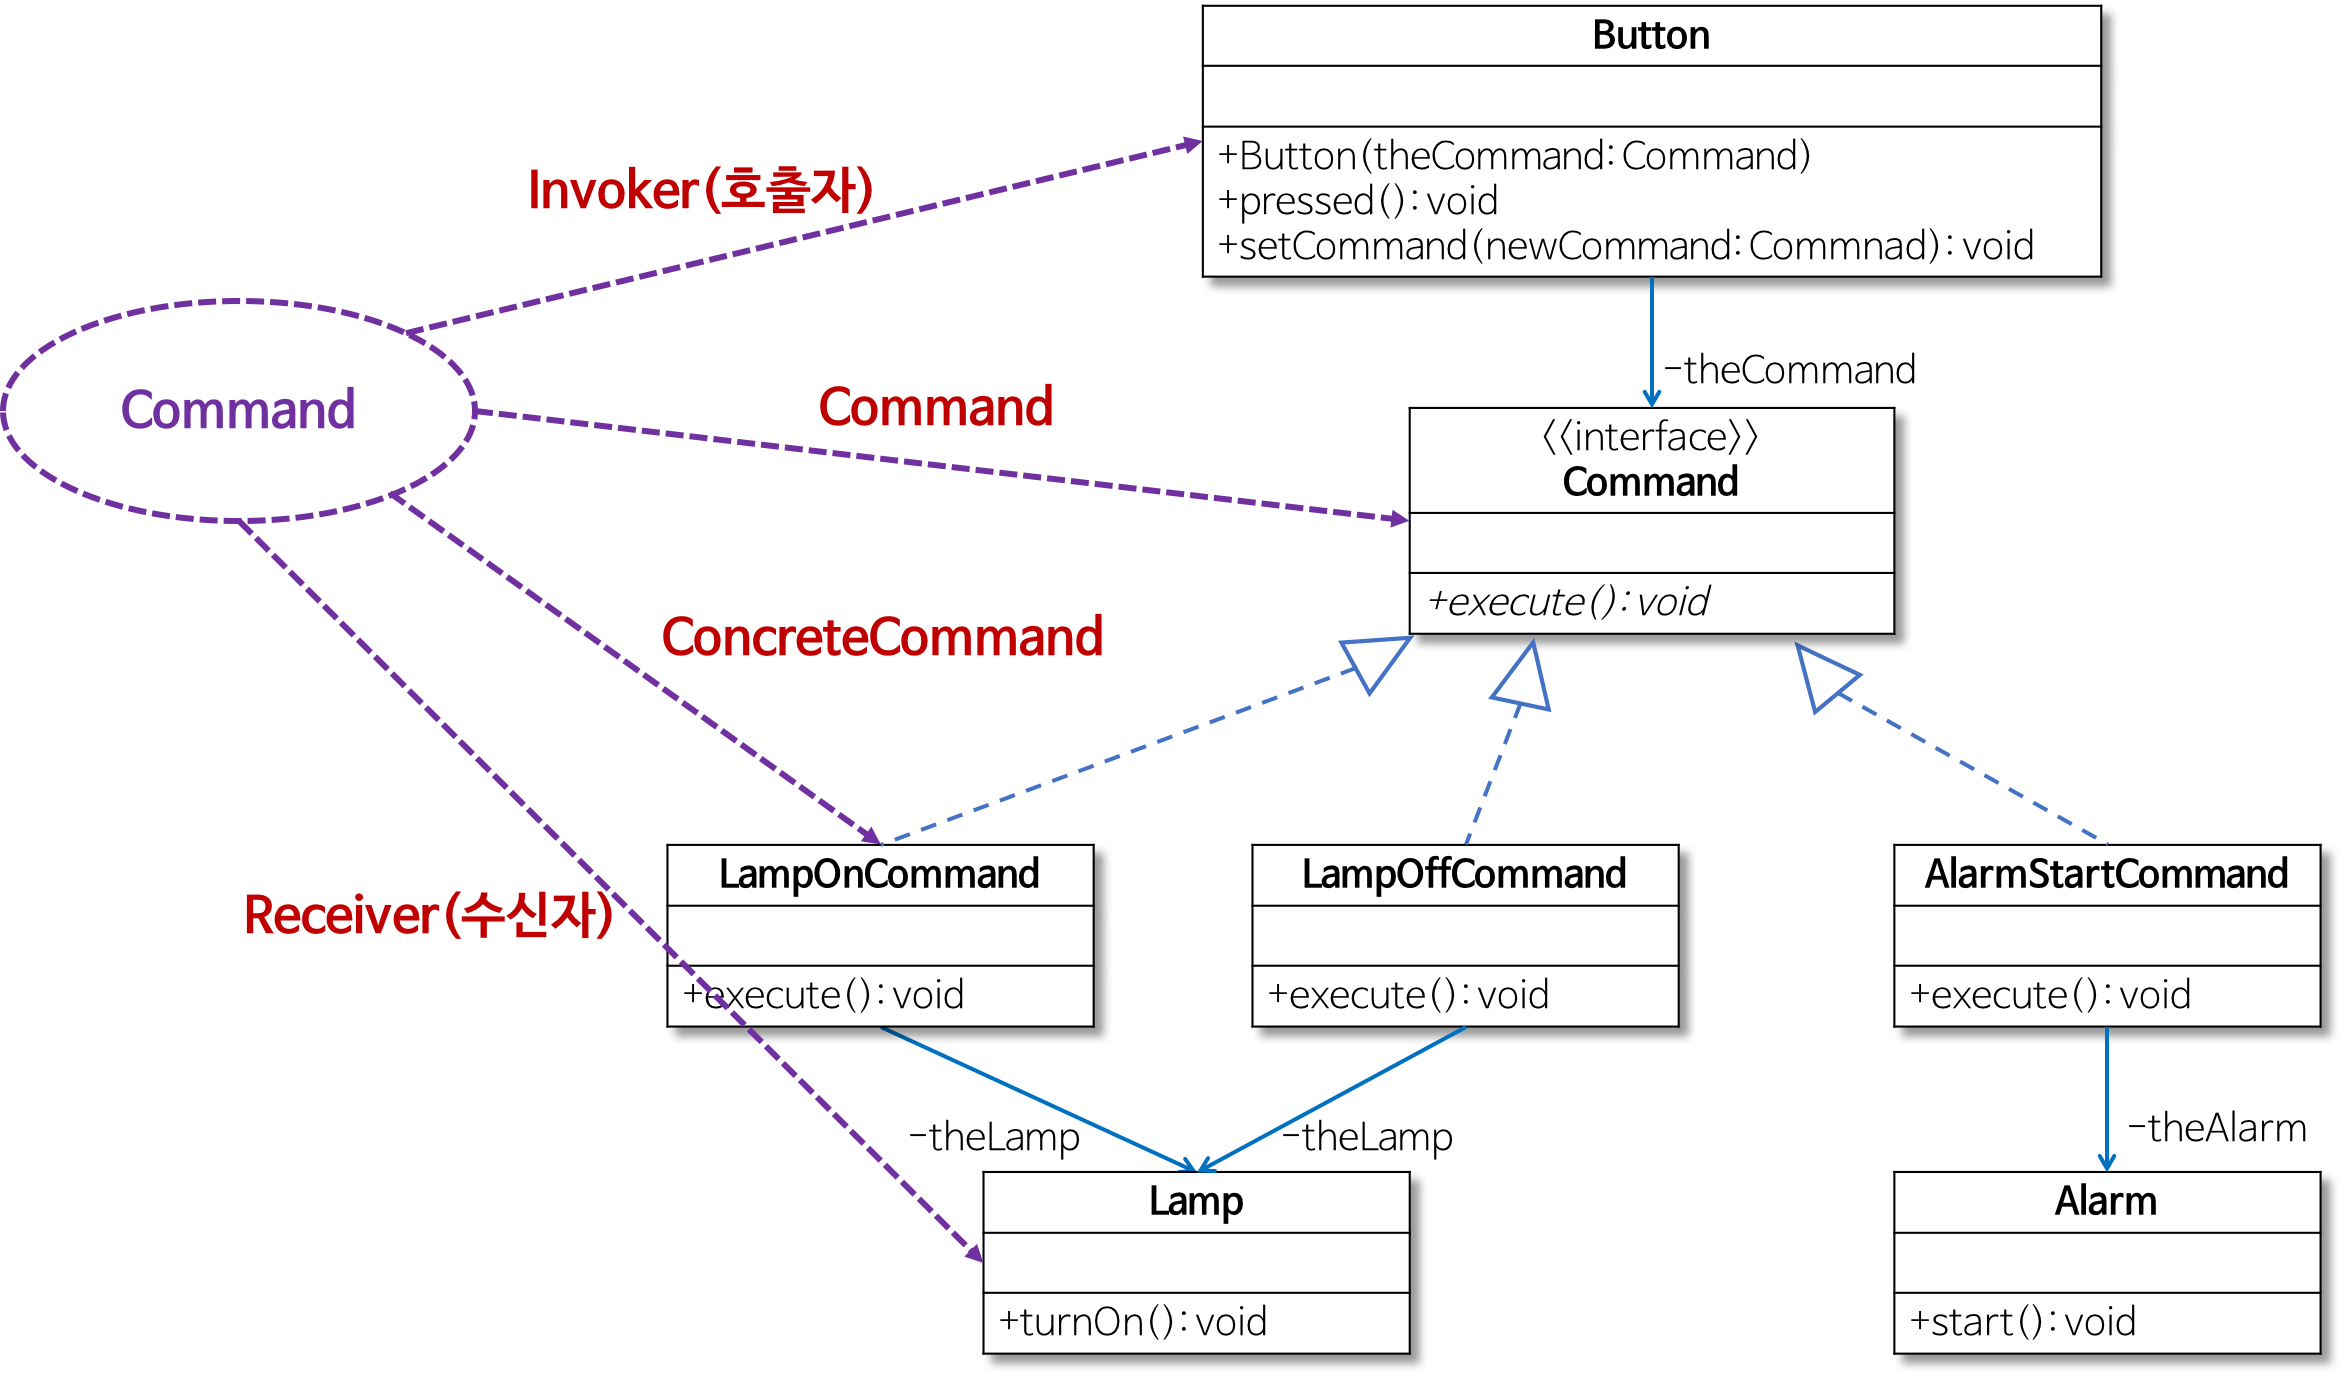
- Command 클래스
public interface Command { public abstract void execute(); } - Button 클래스
public class Button { private Command theCommand; // 생성자에서 버튼을 눌렀을 때 필요한 기능을 인지로 받는다. public Button(Command theCommand) { setCommand(theCommand); } public void setCommand(Command newCommand) { this.theCommand = newCommand; } // 버튼이 눌리면 주어진 Command의 execute 메서드를 호출한다. public void pressed() { theCommand.execute(); } - Lamp, LampOnCommand 클래스
public class Lamp { public void turnOn(){ System.out.println("Lamp On"); } } /* 램프를 켜는 LampOnCommand 클래스 */ public class LampOnCommand implements Command { private Lamp theLamp; public LampOnCommand(Lamp theLamp) { this.theLamp = theLamp; } // Command 인터페이스의 execute 메서드 public void execute() { theLamp.turnOn(); } } - Alarm, AlarmStartCommand 클래스
public class Alarm { public void start(){ System.out.println("Alarming"); } } /* 알람을 울리는 AlarmStartCommand 클래스 */ public class AlarmStartCommand implements Command { private Alarm theAlarm; public AlarmStartCommand(Alarm theAlarm) { this.theAlarm = theAlarm; } // Command 인터페이스의 execute 메서드 public void execute() { theAlarm.start(); } } - 클라이언트에서의 사용
public class Client { public static void main(String[] args) { Lamp lamp = new Lamp(); Command lampOnCommand = new LampOnCommand(lamp); Alarm alarm = new Alarm(); Command alarmStartCommand = new AlarmStartCommand(alarm); Button button1 = new Button(lampOnCommand); // 램프 켜는 Command 설정 button1.pressed(); // 램프 켜는 기능 수행 Button button2 = new Button(alarmStartCommand); // 알람 울리는 Command 설정 button2.pressed(); // 알람 울리는 기능 수행 button2.setCommand(lampOnCommand); // 다시 램프 켜는 Command로 설정 button2.pressed(); // 램프 켜는 기능 수행 } } - Command 인터페이스를 구현하는 LampOnCommand와 AlarmStartCommand 객체를 Button 객체에 설정한다.
- Button 클래스의 pressed 메서드에서 Command 인터페이스의 execute 메서드를 호출한다.
- 즉, 버튼을 눌렀을 때 필요한 임의의 기능은 Command 인터페이스를 구현한 클래스의 객체를 Button 객체에 설정해서 실행할 수 있다.
- 이렇게 Command 패턴을 이용하면 Button 클래스의 코드를 변경하지 않으면서 다양한 동작을 구현할 수 있게 된다.
- 스트래티지(Strategy) 패턴에 대해 알고 싶으시면 스트래티지(Strategy) 패턴을 참고하시기 바랍니다.
- 싱글턴(Singleton) 패턴에 대해 알고 싶으시면 싱글턴(Singleton) 패턴을 참고하시기 바랍니다.
- 옵저버(Observer) 패턴에 대해 알고 싶으시면 옵저버(Observer) 패턴을 참고하시기 바랍니다.
- 데코레이터(Decorator) 패턴에 대해 알고 싶으시면 데코레이터(Decorator) 패턴을 참고하시기 바랍니다.
- 템플릿 메서드(Template Method) 패턴에 대해 알고 싶으시면 템플릿 메서드(Template Method) 패턴을 참고하시기 바랍니다.
- 팩토리 메서드(Factory Method) 패턴에 대해 알고 싶으시면 팩토리 메서드(Factory Method) 패턴을 참고하시기 바랍니다.
- 추상 팩토리(Abstract Factory) 패턴에 대해 알고 싶으시면 추상 팩토리(Abstract Factory) 패턴을 참고하시기 바랍니다.
- 컴퍼지트(Composite) 패턴에 대해 알고 싶으시면 컴퍼지트(Composite) 패턴에을 참고하시기 바랍니다.


近期评论