一、actuator介绍
- actuator是Springboot提供的用来对应用系统进行自省和监控的功能模块,借助于actuator开发者可以很方便地对应用系统某些监控指标进行查看、统计等
- 参考文档:docs.spring.io/spring-boot…
二、搭建actuator环境
- 新建springboot项目,添加maven依赖
<dependency>
    <groupId>org.springframework.boot</groupId>
    <artifactId>spring-boot-starter-actuator</artifactId>
</dependency>
复制代码
- 启动项目,访问地址为
{
	"_links": {
		"self": {
			"href": "http://localhost:8426/actuator",
			"templated": false
		},
		"health": {
			"href": "http://localhost:8426/actuator/health",
			"templated": false
		},
		"health-path": {
			"href": "http://localhost:8426/actuator/health/{*path}",
			"templated": true
		},
		"info": {
			"href": "http://localhost:8426/actuator/info",
			"templated": false
		}
	}
}
复制代码
- 默认情况下只开启了health和info端点的对外访问,如果开启所有端点访问需要做以下配置
management:
endpoint:
health:
show-details: ALWAYS
shutdown:
enabled: true
endpoints:
web:
exposure:
include: "*"
复制代码
- 重新访问即可显示所有端点
{
	"_links": {
		"self": {
			"href": "http://localhost:8426/actuator",
			"templated": false
		},
		"beans": {
			"href": "http://localhost:8426/actuator/beans",
			"templated": false
		},
		"caches-cache": {
			"href": "http://localhost:8426/actuator/caches/{cache}",
			"templated": true
		},
		"caches": {
			"href": "http://localhost:8426/actuator/caches",
			"templated": false
		},
		"health": {
			"href": "http://localhost:8426/actuator/health",
			"templated": false
		},
		"health-path": {
			"href": "http://localhost:8426/actuator/health/{*path}",
			"templated": true
		},
		"info": {
			"href": "http://localhost:8426/actuator/info",
			"templated": false
		},
		"conditions": {
			"href": "http://localhost:8426/actuator/conditions",
			"templated": false
		},
		"shutdown": {
			"href": "http://localhost:8426/actuator/shutdown",
			"templated": false
		},
		"configprops": {
			"href": "http://localhost:8426/actuator/configprops",
			"templated": false
		},
		"env": {
			"href": "http://localhost:8426/actuator/env",
			"templated": false
		},
		"env-toMatch": {
			"href": "http://localhost:8426/actuator/env/{toMatch}",
			"templated": true
		},
		"loggers": {
			"href": "http://localhost:8426/actuator/loggers",
			"templated": false
		},
		"loggers-name": {
			"href": "http://localhost:8426/actuator/loggers/{name}",
			"templated": true
		},
		"heapdump": {
			"href": "http://localhost:8426/actuator/heapdump",
			"templated": false
		},
		"threaddump": {
			"href": "http://localhost:8426/actuator/threaddump",
			"templated": false
		},
		"metrics": {
			"href": "http://localhost:8426/actuator/metrics",
			"templated": false
		},
		"metrics-requiredMetricName": {
			"href": "http://localhost:8426/actuator/metrics/{requiredMetricName}",
			"templated": true
		},
		"scheduledtasks": {
			"href": "http://localhost:8426/actuator/scheduledtasks",
			"templated": false
		},
		"mappings": {
			"href": "http://localhost:8426/actuator/mappings",
			"templated": false
		}
	}
}
复制代码
- 端点信息
| 类型 |
API端口 |
描述 |
| GET |
/beans |
应用程序上下文bean以及之间的关系 |
| GET |
/caches |
缓存信息 |
| GET |
/health |
应用程序的健康指标 |
| GET |
/info |
获取应用程序的信息 |
| GET |
/conditions |
bean状态条件详情 |
| POST |
/shutdown |
关闭服务节点 |
| GET |
/configprops |
描述配置属性如何注入bean |
| GET |
/env |
全部环境属性信息 |
| GET |
/metrics |
应用程序度量信息 |
| GET |
/mappings |
URL路径和控制器映射关系 |
| GET |
/autoconfig |
自动配置报告,哪些条件通过,哪些条件没有通过 |
- 例如访问health信息
{
    "status": "UP",
    "components": {
        "diskSpace": {
            "status": "UP",
            "details": {
                "total": 153276153856,
                "free": 107921981440,
                "threshold": 10485760
            }
        },
        "ping": {
            "status": "UP"
        }
    }
}
复制代码
三、拓展health监控端点
- 默认端点只有上面的端点信息,如果想要拓展端点信息则可以自定义或者拓展已有的端点信息
- 需要继承AbstractHealthIndicator指示器,然后加上**@Component**加入容器
- 继承类名称需要注意,如果是XxxHealthIndicator也就是结尾是HealthIndicator的注入监控的名称为xxx,首字母小写;如果非此结尾的则以类名首字母小写加入端点
import org.springframework.boot.actuate.health.AbstractHealthIndicator;
import org.springframework.boot.actuate.health.Health;
import org.springframework.stereotype.Component;
@Component
public class ExtendHealthIndicator extends AbstractHealthIndicator {
@Override
protected void doHealthCheck(Health.Builder builder) throws Exception {
builder.up().withDetail("website", "www.codecoord.com");
}
}
复制代码
- 重新启动,然后访问健康端点,此时可以看到新加的信息
- 类名非HealthIndicator结尾所以类名首字母小写加入监控端点,此处为XxxHealthIndicator结尾情形
{
	"status": "UP",
	"components": {
		"diskSpace": {
			"status": "UP",
			"details": {
				"total": 214750457856,
				"free": 213597241344,
				"threshold": 10485760,
				"exists": true
			}
		},
		"extend": {
			"status": "UP",
			"details": {
				"website": "www.codecoord.com"
			}
		},
		"ping": {
			"status": "UP"
		}
	}
}
复制代码
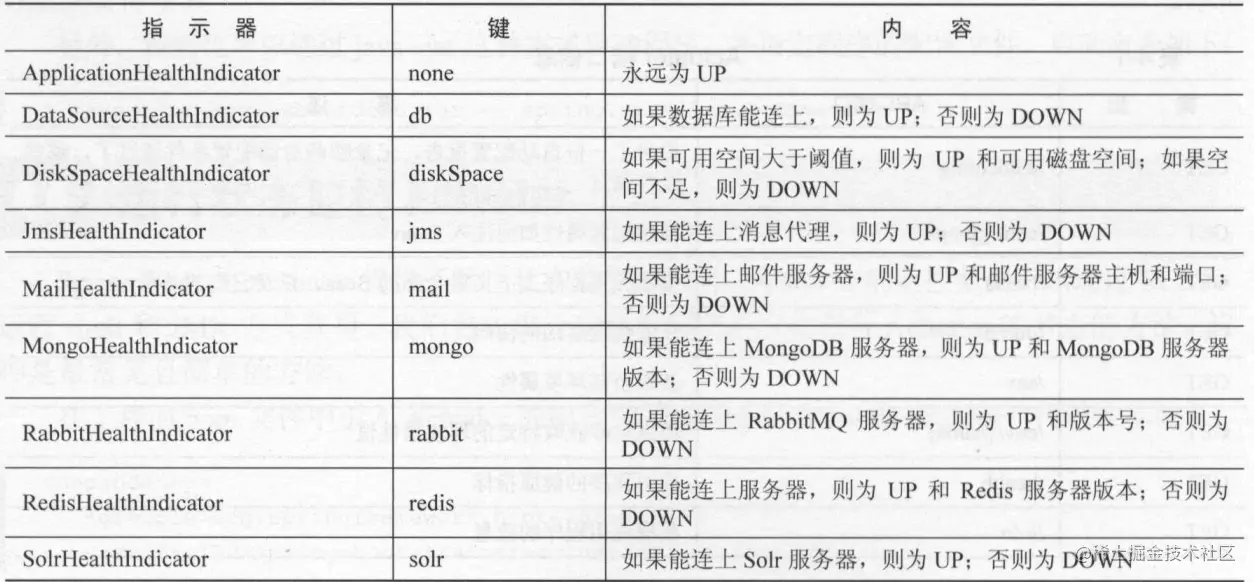
- 更多监控指示器
四、自定义监控端点
- 除了拓展端点,也可以自定义端口
- 自定义端点类上需要使用**@Endpoint(id = "name")注解,标识端点名称,然后同样需要注解@Component **将类加入spring
- 在监控的方法上需要加上**@ReadOperation **, 可以通过GET方法进行调用
import org.springframework.boot.actuate.endpoint.annotation.Endpoint;
import org.springframework.boot.actuate.endpoint.annotation.ReadOperation;
import org.springframework.stereotype.Component;

import java.util.ArrayList;
import java.util.HashMap;
import java.util.List;
import java.util.Map;

@Component
@Endpoint(id = "advanced")
public class ExtendsEndPoint {
    @ReadOperation
    public List<Map<String, Object>> advancedHealth() {
        List<Map<String, Object>> detailList = new ArrayList<>();
        Map<String, Object> detailMap = new HashMap<>(10);
        detailMap.put("name", "advanced");
        detailMap.put("desc", "自定义端点信息");
        detailMap.put("impl-类", "类使用注解@Endpoint(id = \"xxx\")");
        detailMap.put("impl-方法注解", "类使用注解@Endpoint(id = \"xxx\")");
        detailMap.put("impl-方法返回值类型", "方法返回值:@ReadOperation");
        detailMap.put("impl-参考", "com.codecoord.springboot.practice.actuator.ExtendsEndPoint");
        detailList.add(detailMap);
        return detailList;
    }
}
复制代码
- 访问新端点
[
	{
		"impl-方法注解": "类使用注解@Endpoint(id = \"xxx\")",
		"name": "advanced",
		"impl-参考": "com.codecoord.springboot.practice.actuator.ExtendsEndPoint",
		"impl-方法返回值类型": "方法返回值:@ReadOperation",
		"desc": "自定义端点信息",
		"impl-类": "类使用注解@Endpoint(id = \"xxx\")"
	}
]
复制代码


近期评论