
上篇文章中,我们学习了入门示例HelloWorld,这一章我们将学习流程定义的CRUD,了解流程定义文档,流程定义的部署、查询和删除以及操作流程定义过程中的数据库表数据变化。
流程定义文档
流程定义文档由bpmn文件和展示流程图的图片这两部分组成
bpmn文件(流程规则文件)
在BPMN 2.0文件中,其根节点是definitions节点。 在这个元素中,可以定义多个流程定义(不过我们建议每个文件只包含一个流程定义, 可以简化开发过程中的维护难度)。 注意,definitions元素最少也要包含xmlns 和 targetNamespace的声明。 targetNamespace可以是任意值,它用来对流程实例进行分类。
一个典型的bpmn文件如下
1
2
3
4
5
6
7
8
9
10
11
12
13
14
15
16
17
18
19
20
21
22
23
24
25
26
27
28
29
30
31
32
33
34
35
36
37
38
39
40
41
42
43
44
45
46
47
48
49
50
51
52
53
54
55
56
57
58
59
|
<definitions xmlns="http://www.omg.org/spec/BPMN/20100524/MODEL"
xmlns:xsi="http://www.w3.org/2001/XMLSchema-instance"
xmlns:xsd="http://www.w3.org/2001/XMLSchema"
xmlns:activiti="http://activiti.org/bpmn"
xmlns:bpmndi="http://www.omg.org/spec/BPMN/20100524/DI"
xmlns:omgdc="http://www.omg.org/spec/DD/20100524/DC"
xmlns:omgdi="http://www.omg.org/spec/DD/20100524/DI"
typeLanguage="http://www.w3.org/2001/XMLSchema"
expressionLanguage="http://www.w3.org/1999/XPath"
targetNamespace="http://www.activiti.org/test">

  <process id="helloworld" name="helloworldProcess" isExecutable="true">
    <startEvent id="startevent1" name="Start"></startEvent>
    <endEvent id="endevent1" name="End"></endEvent>
    <userTask id="usertask1" name="提交申请" activiti:assignee="张三"></userTask>
    <userTask id="usertask2" name="审批【部门经理】" activiti:assignee="李四"></userTask>
    <userTask id="usertask3" name="审批【总经理】" activiti:assignee="王五"></userTask>
    <sequenceFlow id="flow1" sourceRef="startevent1" targetRef="usertask1"></sequenceFlow>
    <sequenceFlow id="flow2" sourceRef="usertask1" targetRef="usertask2"></sequenceFlow>
    <sequenceFlow id="flow3" sourceRef="usertask2" targetRef="usertask3"></sequenceFlow>
    <sequenceFlow id="flow4" sourceRef="usertask3" targetRef="endevent1"></sequenceFlow>
  </process>
  <bpmndi:BPMNDiagram id="BPMNDiagram_helloworld">
    <bpmndi:BPMNPlane bpmnElement="helloworld" id="BPMNPlane_helloworld">
      <bpmndi:BPMNShape bpmnElement="startevent1" id="BPMNShape_startevent1">
        <omgdc:Bounds height="35.0" width="35.0" x="390.0" y="50.0"></omgdc:Bounds>
      </bpmndi:BPMNShape>
      <bpmndi:BPMNShape bpmnElement="endevent1" id="BPMNShape_endevent1">
        <omgdc:Bounds height="35.0" width="35.0" x="390.0" y="380.0"></omgdc:Bounds>
      </bpmndi:BPMNShape>
      <bpmndi:BPMNShape bpmnElement="usertask1" id="BPMNShape_usertask1">
        <omgdc:Bounds height="55.0" width="105.0" x="355.0" y="120.0"></omgdc:Bounds>
      </bpmndi:BPMNShape>
      <bpmndi:BPMNShape bpmnElement="usertask2" id="BPMNShape_usertask2">
        <omgdc:Bounds height="55.0" width="105.0" x="355.0" y="200.0"></omgdc:Bounds>
      </bpmndi:BPMNShape>
      <bpmndi:BPMNShape bpmnElement="usertask3" id="BPMNShape_usertask3">
        <omgdc:Bounds height="55.0" width="105.0" x="355.0" y="290.0"></omgdc:Bounds>
      </bpmndi:BPMNShape>
      <bpmndi:BPMNEdge bpmnElement="flow1" id="BPMNEdge_flow1">
        <omgdi:waypoint x="407.0" y="85.0"></omgdi:waypoint>
        <omgdi:waypoint x="407.0" y="120.0"></omgdi:waypoint>
      </bpmndi:BPMNEdge>
      <bpmndi:BPMNEdge bpmnElement="flow2" id="BPMNEdge_flow2">
        <omgdi:waypoint x="407.0" y="175.0"></omgdi:waypoint>
        <omgdi:waypoint x="407.0" y="200.0"></omgdi:waypoint>
      </bpmndi:BPMNEdge>
      <bpmndi:BPMNEdge bpmnElement="flow3" id="BPMNEdge_flow3">
        <omgdi:waypoint x="407.0" y="255.0"></omgdi:waypoint>
        <omgdi:waypoint x="407.0" y="290.0"></omgdi:waypoint>
      </bpmndi:BPMNEdge>
      <bpmndi:BPMNEdge bpmnElement="flow4" id="BPMNEdge_flow4">
        <omgdi:waypoint x="407.0" y="345.0"></omgdi:waypoint>
        <omgdi:waypoint x="407.0" y="380.0"></omgdi:waypoint>
      </bpmndi:BPMNEdge>
    </bpmndi:BPMNPlane>
  </bpmndi:BPMNDiagram>
</definitions>
|
可以看到,该文件的根节点是definitions,包含了targetNamespace和xmlns的声明。
在部署后,系统每次启动时都会解析bpmn文件,把内容封装成流程定义放入项目缓存中。Activiti框架结合这个xml文件自动管理流程,流程的执行就是按照bpmn文件定义的规则执行的
流程图文件
在系统里需要展示流程走向的图片,展示给用户看
管理和分析流程定义运行
为了更好地讲述流程定义,在src/main/java新建新包cn.processdefinition,并创建类ProcessDefinitionTest
部署流程定义
无论如何,对于一个流程来说,都必须先部署,其代码和上篇中的代码基本一样
1
2
3
4
5
6
7
8
9
10
11
12
13
14
|
@Test
public void () {
Deployment deploy = processEngine.getRepositoryService()
.createDeployment()
.name("流程定义")
.addClasspathResource("diagrams/helloworld.bpmn")
.addClasspathResource("diagrams/helloworld.png").deploy();
System.out.println("部署ID: " + deploy.getId());
System.out.println("部署名称: " + deploy.getName());
}
|
运行上述代码,可以得到如下结果
部署ID: 501
部署名称: 流程定义
接下来,我们来看一下部署流程定义涉及到的表操作
部署流程定义涉及到的相关表
我们知道,部署流程定义的主要操作可以分解为以下几个步骤
- 首先获得默认的流程引擎,然后,通过流程引擎获取一个repositoryService对象(仓库对象)
- 由仓库的服务对象产生一个部署对象配置对象,用来封装部署操作的相关配置。
- 这是一个链式编程,在部署配置对象中设置显示名,上传流程定义规则文件
- 向数据库表中存放流程定义的规则信息,在这最后一步中,其操作主要涉及到了三张表:act_re_deployment(部署对象表),act_re_procdef(流程定义表),act_ge_bytearray(资源文件表)
第一张表act_re_deployment(部署对象表),存放流程定义的显示名和部署时间,每部署一次增加一条记录

第二张表act_re_procdef(流程定义表),存放流程定义的属性信息,部署每个新的流程定义都会在这张表中增加一条记录。当流程定义的key相同的情况下,使用的是版本升级,
从图中可以看到,两条记录的KEY值是一样的,VERSION不一样,存在两个不同的版本,且版本为2的记录是后生成的。观察字段ID_,其组成为KEY:VERSION_:随机数格式


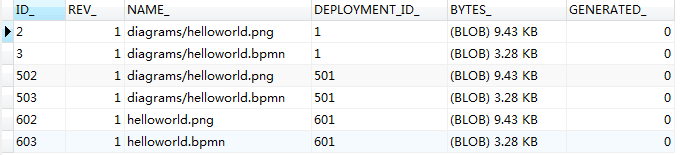
第三张表act_ge_bytearray(资源文件表)存储流程定义相关的部署信息。即流程定义文档的存放地址。每部署一次就会增加两条记录,一条是关于bpmn规则文件的,一条是图片的(如果部署时只指定了bpmn一个文件,activiti会在部署时解析bpmn文件内容自动生成流程图)。两个文件不是很大,都是以二进制形式存储在数据库中,存储字段为 BYTES_

当然,还有比较一张特殊的表act_ge_property(主键生成策略表),该表生成了下一次部署流程时使用的部署对象主键ID

部署流程定义(zip格式文件)
除了直接使用helloworld.bpmn和helloworld.png文件部署流程之外,还可以使用zip来部署流程。可以将上述项目中的这两个文件压缩为一个helloworld.zip文件放到src/main/resources/diagrams目录下,通过代码实现部署流程定义,实现代码如下所示
1
2
3
4
5
6
7
8
9
10
11
12
13
14
15
16
|
@Test
public void deploymentProcessDefinitionZip() {
InputStream in = this.getClass().getClassLoader().getResourceAsStream("diagrams/helloworld.zip");
ZipInputStream zipInputStream = new ZipInputStream(in);
Deployment deploy = processEngine.getRepositoryService()
.createDeployment()
.name("流程定义")
.addZipInputStream(zipInputStream)
.deploy();
System.out.println("部署ID: " + deploy.getId());
System.out.println("部署名称: " + deploy.getName());
}
|
可以看到,上述代码通过addZipInputStream(zipInputStream)加载一个压缩文件流实现了使用zip文件部署流程定义。此时,输出如下结果
部署ID: 601
部署名称: 流程定义
当部署完成之后,部署对象表增加一条记录,流程定义表会增加一条记录,资源文件表增加两条记录,主键生成策略表生成下一次部署流程定义时使用到的部署对象ID
部署对象表
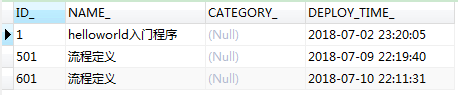
可以看到,该新增记录的ID_值正好为上一节中主键生成策略表中的VALUE_ 值
流程定义表


从图中可知,该表增加了一条记录,版本字段值较上一个版本增加1
资源文件表
主键生成策略表
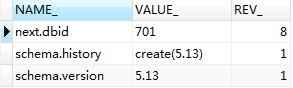
从上面例子很容易预见,该VALUE_值为下一次部署流程定义时使用的流程ID
查看流程定义
有些时候,我们需要查询流程定义,其代码可以这样写
1
2
3
4
5
6
7
8
9
10
11
12
13
14
15
16
17
18
19
20
21
22
23
24
25
26
27
28
29
30
31
32
33
|
@Test
public void findProcessDefinition() {
List<ProcessDefinition> list = processEngine.getRepositoryService()
.createProcessDefinitionQuery()
.orderByProcessDefinitionVersion().asc()
.list();
if(list!=null && list.size()>0) {
for(ProcessDefinition pd:list) {
System.out.println("流程定义ID:"+pd.getId());
System.out.println("流程定义的名称:"+pd.getName());
System.out.println("流程定义的key:"+pd.getKey());
System.out.println("流程定义的版本:"+pd.getVersion());
System.out.println("资源名称bpmn文件:"+pd.getResourceName());
System.out.println("资源名称png文件:"+pd.getDiagramResourceName());
System.out.println("部署对象的ID:"+pd.getDeploymentId());
System.out.println("#######################################");
}
}
}
|
运行该段代码,从结果中得出以下结论
- 流程定义和部署对象的service都是repositoryService
- 创建流程定义查询对象,可以在ProcessDefinitionQuery上设置查询的相关参数
- 调用ProcessDefinitionQuery对象的list()方法,执行查询,获得符合条件的流程定义列表
- 比较bpmn文件,可以看出,流程定义中的key和name的值分别为bpmn文件process节点的id和name的属性值,其中,key被用来区分不同的流程定义
- 带有特定key的流程定义第一次部署时,version为1。之后每次部署都会在当前最高版本号上加1
- 流程定义表id的生成规则为:{流程定义key}:{流程定义版本}:{按一定规则生成的数字}
- 重复部署一次,deploymentId的值以一定的形式变化
删除流程定义
有些时候,我们希望删除流程,就可以调用repositoryService的删除流程方法
1
2
3
4
5
6
7
8
9
10
11
12
13
14
15
16
17
|
@Test
public void deleteProcessDefintion () {
String deploymentId = "601";
processEngine.getRepositoryService().deleteDeployment(deploymentId,true);
System.out.println("删除成功!");
}
|
因为删除的是流程定义,而流程定义的部署是属于仓库服务的,所以应该先得到repositoryService。
在删除流程代码中,罗列了使用了两种删除方法。
- 不带级联的删除:该方法只能删除没有启动的流程,如果删除已经启动的流程就会抛出异常,否则用级联删除
- 级联删除:项目开发中使用级联删除的情况比较多,删除操作一般只开放给超级管理员使用
获取流程定义文档的资源(查看流程图附件)
流程定义文档主要是指bpmn文件以及png文件,这里主要查看的是png格式的图片
1
2
3
4
5
6
7
8
9
10
11
12
13
14
15
16
17
18
19
20
21
22
23
24
25
|
@Test
public void viewPic() throws IOException {
String deploymentId = "801";
List<String> list = processEngine.getRepositoryService().getDeploymentResourceNames(deploymentId);
String resourceName = "";
if(list!=null && list.size()>0) {
for(String name:list) {
if(name.indexOf(".png")>0) {
resourceName = name;
}
}
}
InputStream in = processEngine.getRepositoryService()
.getResourceAsStream(deploymentId, resourceName);
File file = new File("D:/"+resourceName);
FileUtils.copyInputStreamToFile(in, file);
}
|
可以看到,获取流程文档时,我们需要注意以下几点
- 我们使用了流程部署对象ID(deploymentId)
- 资源名称resourceName则为act_ge_bytearray表中NAME_列的值
- 使用repositoryService下的getDeploymentResourceNames方法可以获取指定部署下的所有文件的资源名称
- 使用repositoryService下的getResourceAsStream方法可以获得指定部署下指定资源名称的文件的输入流
- 使用FileUtils工具的copyInputStreamToFile方法,将资源文件以流的形式输出到指定文件夹下
查询最新版本的流程定义
对于流程定义来说,可能存在多个版本,如果想要获取最新版本的流程定义,可以先按照版本号升序排序获取流程定义列表,再遍历列表,获取最新的流程定义
1
2
3
4
5
6
7
8
9
10
11
12
13
14
15
16
17
18
19
20
21
22
23
24
25
26
27
28
29
30
31
32
33
34
|
@Test
public void findLastVersionProcessDefinition() {
List<ProcessDefinition> list = processEngine.getRepositoryService()
.createProcessDefinitionQuery()
.orderByProcessDefinitionVersion().asc()
.list();
Map<String,ProcessDefinition> map = new LinkedHashMap<String,ProcessDefinition>();
if(list!=null && list.size()>0) {
for(ProcessDefinition pd:list) {
map.put(pd.getKey(), pd);
}
}
List<ProcessDefinition> pdList = new ArrayList<ProcessDefinition>(map.values());
if(pdList!=null && pdList.size()>0) {
for(ProcessDefinition pd:pdList) {
System.out.println("流程定义ID:"+pd.getId());
System.out.println("流程定义的名称:"+pd.getName());
System.out.println("流程定义的key:"+pd.getKey());
System.out.println("流程定义的版本:"+pd.getVersion());
System.out.println("资源名称bpmn文件:"+pd.getResourceName());
System.out.println("资源名称png文件:"+pd.getDiagramResourceName());
System.out.println("部署对象的ID:"+pd.getDeploymentId());
System.out.println("#######################################");
}
}
}
|
删除流程定义(删除key相同的所有不同版本的流程定义)
前面我们讲过通过部署对象ID删除流程定义,现在,我们需要根据key删除所有版本的流程定义。
首先,先通过key获取不同版本的流程定义对象列表。接着,循环遍历该对象,通过对象的部署对象ID值逐个删除流程定义,最终,达到删除key值相同的所有不同版本的流程定义的目的。
1
2
3
4
5
6
7
8
9
10
11
12
13
14
15
16
17
|
public void deleteProcessDefinitionByKey() {
String processDefinitionKey = "helloworld";
List<ProcessDefinition> list = processEngine.getRepositoryService().createProcessDefinitionQuery()
.processDefinitionKey(processDefinitionKey)
.list();
if(list!=null && list.size()>0) {
for(ProcessDefinition pd:list) {
String deploymentId = pd.getDeploymentId();
processEngine.getRepositoryService().deleteDeployment(deploymentId, true);
}
}
}
|
完整示例代码
1
2
3
4
5
6
7
8
9
10
11
12
13
14
15
16
17
18
19
20
21
22
23
24
25
26
27
28
29
30
31
32
33
34
35
36
37
38
39
40
41
42
43
44
45
46
47
48
49
50
51
52
53
54
55
56
57
58
59
60
61
62
63
64
65
66
67
68
69
70
71
72
73
74
75
76
77
78
79
80
81
82
83
84
85
86
87
88
89
90
91
92
93
94
95
96
97
98
99
100
101
102
103
104
105
106
107
108
109
110
111
112
113
114
115
116
117
118
119
120
121
122
123
124
125
126
127
128
129
130
131
132
133
134
135
136
137
138
139
140
141
142
143
144
145
146
147
148
149
150
151
152
153
154
155
156
157
158
159
160
161
162
163
164
165
166
167
168
169
170
171
172
173
174
175
176
177
178
179
180
181
182
183
184
185
186
187
|
package cn.demo.processdefinition;
import java.io.File;
import java.io.IOException;
import java.io.InputStream;
import java.util.ArrayList;
import java.util.LinkedHashMap;
import java.util.List;
import java.util.Map;
import java.util.zip.ZipInputStream;
import org.activiti.engine.ProcessEngine;
import org.activiti.engine.ProcessEngines;
import org.activiti.engine.repository.Deployment;
import org.activiti.engine.repository.ProcessDefinition;
import org.activiti.engine.repository.ProcessDefinitionQuery;
import org.apache.commons.io.FileUtils;
import org.junit.Test;
public class ProcessDefinitionTest {
private ProcessEngine processEngine = ProcessEngines.getDefaultProcessEngine();
@Test
public void () {
Deployment deploy = processEngine.getRepositoryService()
.createDeployment()
.name("流程定义")
.addClasspathResource("diagrams/helloworld.bpmn")
.addClasspathResource("diagrams/helloworld.png").deploy();
System.out.println("部署ID: " + deploy.getId());
System.out.println("部署名称: " + deploy.getName());
}
@Test
public void deploymentProcessDefinitionZip() {
InputStream in = this.getClass().getClassLoader().getResourceAsStream("diagrams/helloworld.zip");
ZipInputStream zipInputStream = new ZipInputStream(in);
Deployment deploy = processEngine.getRepositoryService()
.createDeployment()
.name("流程定义")
.addZipInputStream(zipInputStream)
.deploy();
System.out.println("部署ID: " + deploy.getId());
System.out.println("部署名称: " + deploy.getName());
}
@Test
public void findProcessDefinition() {
List<ProcessDefinition> list = processEngine.getRepositoryService()
.createProcessDefinitionQuery()
.orderByProcessDefinitionVersion().asc()
.list();
if(list!=null && list.size()>0) {
for(ProcessDefinition pd:list) {
System.out.println("流程定义ID:"+pd.getId());
System.out.println("流程定义的名称:"+pd.getName());
System.out.println("流程定义的key:"+pd.getKey());
System.out.println("流程定义的版本:"+pd.getVersion());
System.out.println("资源名称bpmn文件:"+pd.getResourceName());
System.out.println("资源名称png文件:"+pd.getDiagramResourceName());
System.out.println("部署对象的ID:"+pd.getDeploymentId());
System.out.println("#######################################");
}
}
}
@Test
public void deleteProcessDefintion () {
String deploymentId = "601";
processEngine.getRepositoryService().deleteDeployment(deploymentId,true);
System.out.println("删除成功!");
}
@Test
public void viewPic() throws IOException {
String deploymentId = "801";
List<String> list = processEngine.getRepositoryService().getDeploymentResourceNames(deploymentId);
String resourceName = "";
if(list!=null && list.size()>0) {
for(String name:list) {
if(name.indexOf(".png")>0) {
resourceName = name;
}
}
}
InputStream in = processEngine.getRepositoryService()
.getResourceAsStream(deploymentId, resourceName);
File file = new File("D:/"+resourceName);
FileUtils.copyInputStreamToFile(in, file);
}
@Test
public void findLastVersionProcessDefinition() {
List<ProcessDefinition> list = processEngine.getRepositoryService()
.createProcessDefinitionQuery()
.orderByProcessDefinitionVersion().asc()
.list();
Map<String,ProcessDefinition> map = new LinkedHashMap<String,ProcessDefinition>();
if(list!=null && list.size()>0) {
for(ProcessDefinition pd:list) {
map.put(pd.getKey(), pd);
}
}
List<ProcessDefinition> pdList = new ArrayList<ProcessDefinition>(map.values());
if(pdList!=null && pdList.size()>0) {
for(ProcessDefinition pd:pdList) {
System.out.println("流程定义ID:"+pd.getId());
System.out.println("流程定义的名称:"+pd.getName());
System.out.println("流程定义的key:"+pd.getKey());
System.out.println("流程定义的版本:"+pd.getVersion());
System.out.println("资源名称bpmn文件:"+pd.getResourceName());
System.out.println("资源名称png文件:"+pd.getDiagramResourceName());
System.out.println("部署对象的ID:"+pd.getDeploymentId());
System.out.println("#######################################");
}
}
}
public void deleteProcessDefinitionByKey() {
String processDefinitionKey = "helloworld";
List<ProcessDefinition> list = processEngine.getRepositoryService().createProcessDefinitionQuery()
.processDefinitionKey(processDefinitionKey)
.list();
if(list!=null && list.size()>0) {
for(ProcessDefinition pd:list) {
String deploymentId = pd.getDeploymentId();
processEngine.getRepositoryService().deleteDeployment(deploymentId, true);
}
}
}
}
|


近期评论