
日志框架中我们选择的是SLF4J日志门面。日志实现选择的是Logback。调用日志记录的方法,不应该直接调用实现类,而是调用日志抽象层里面的方法。
1.使用slf4j的方法
给系统导入slf4j包和日志实现Logback包,如果要使用log4j,就导入slf4j和slf4j-log4、log4j包
1
2
3
4
5
6
7
8
9
|
import org.slf4j.Logger;
import org.slf4j.LoggerFactory;

public class  {
  public static void main(String[] args) {
    Logger logger = LoggerFactory.getLogger(HelloWorld.class);
    logger.info("Hello World");
  }
}
|
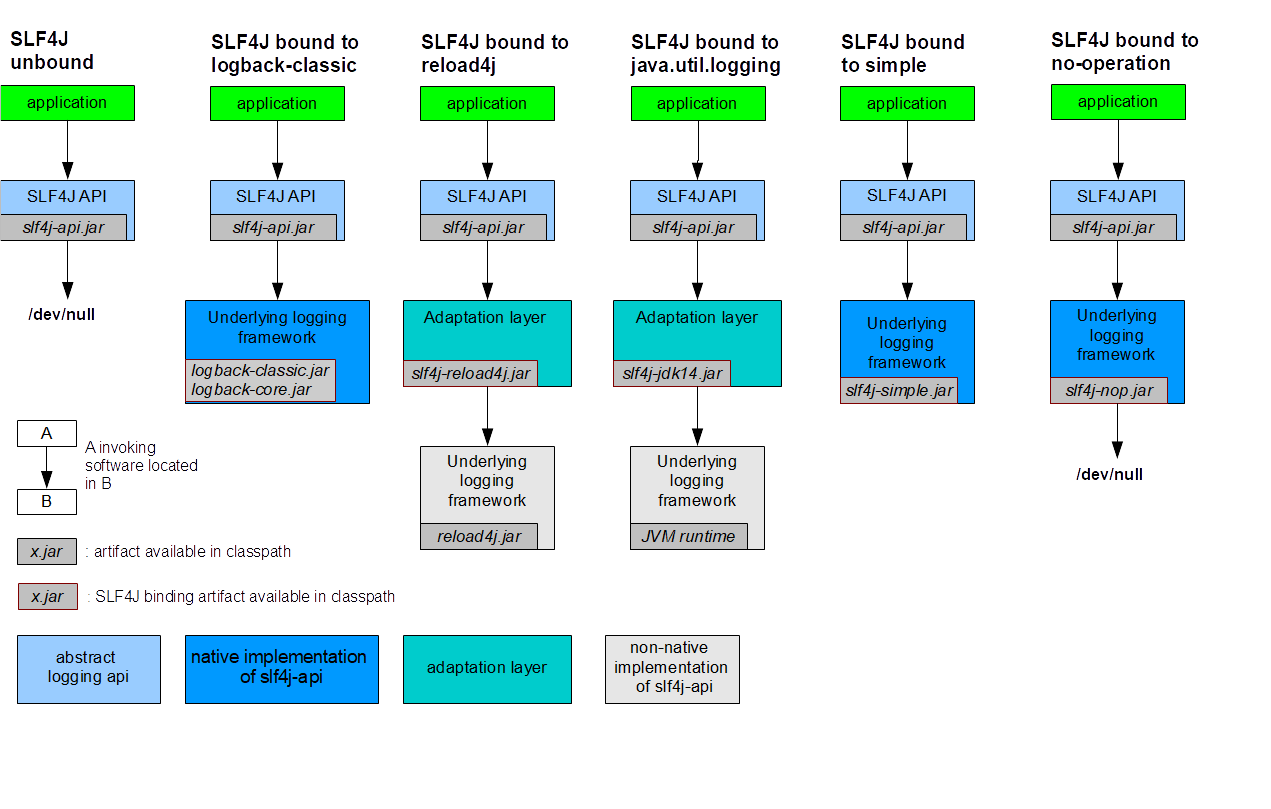
每一个日志的实现框架都有自己的配置文件,使用slf4j以后,配置文件还是写日志实现框架的配置文件。
2.统一日志记录
统一日志框架官方图示
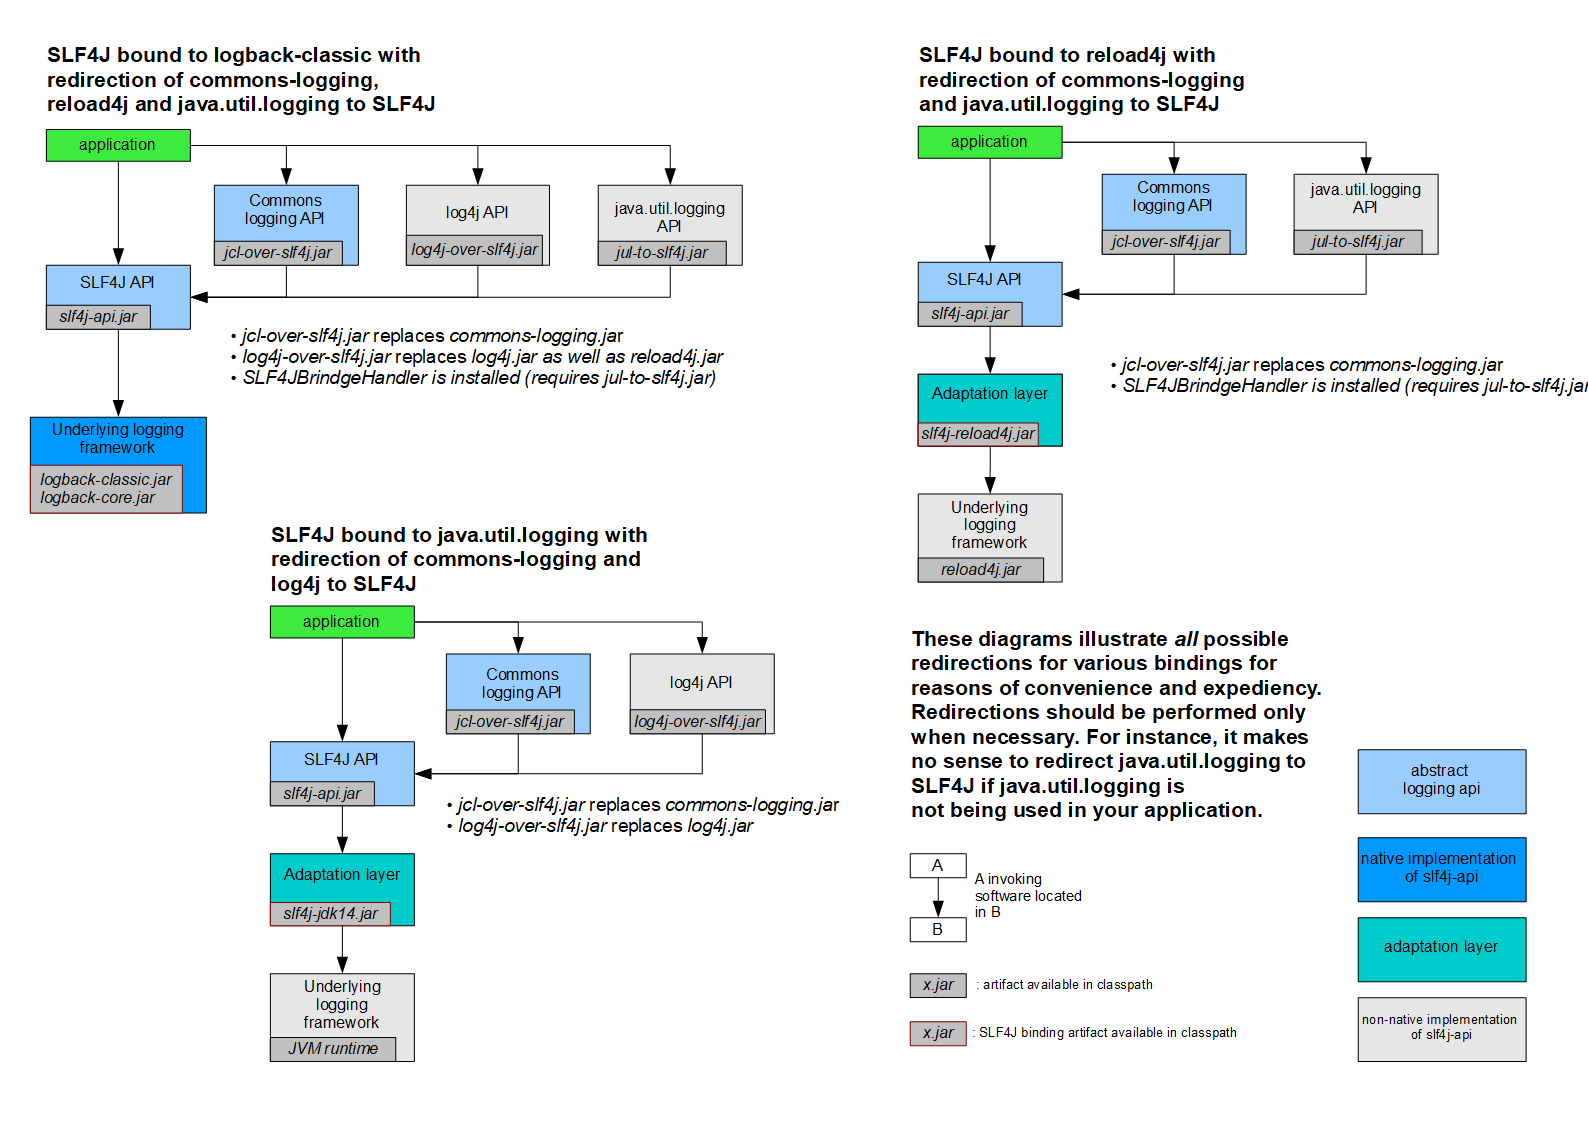
统一日志框架方法总结
1、将系统中的其他日志框架先排除出去。
2、用中间包来替换原有的日志框架。
3、我们导入slf4j其他的实现
3.SpringBoot中的日志关系
1
2
3
4
5
6
|
<dependency>
     <groupId>org.springframework.boot</groupId>
     <artifactId>spring-boot-starter</artifactId>
     <version>2.0.0.RELEASE</version>
     <scope>compile</scope>
   </dependency>
|
SpringBoot使用下面的日志
1
2
3
4
5
6
|
<dependency>
     <groupId>org.springframework.boot</groupId>
     <artifactId>spring-boot-starter-logging</artifactId>
     <version>2.0.0.RELEASE</version>
     <scope>compile</scope>
   </dependency>
|
SpringBoot日志依赖图示

SpringBoot底层使用slf4j+logback的方式进行日志记录。同时将其他日志框架也装换为slf4框架。
如果我们使用其他框架,就先把这个框架的默认日志框架给排除,例如我们使用Spring,就先排除Spring默认的commons-logging日志框架。
4.SpringBoot中使用slf4j
SpringBoot默认配置了日志框架,我们直接就可以使用,如下
1
2
3
4
5
6
7
8
9
10
11
12
13
14
15
16
17
18
19
|
(SpringRunner.class)
@SpringBootTest
public class SpringBootConfigApplicationTests {
Logger logger = LoggerFactory.getLogger(getClass());
@Test
public void contextLoads() {
logger.trace("这是trace日志");
logger.debug("这是debug日志");
logger.info("这是自定义的info日志");
logger.warn("这是警告日志");
logger.error("这是错误日志");
}
}
|
修改日志级别的方法,添加配置文件
指定日志文件输出位置
| logging.file |
logging.path |
Example |
Desciption |
| (none) |
(none) |
|
只在控制台输出 |
| 指定文件名 |
(none) |
my.log |
输出日志到my.log文件 |
| (none) |
指定目录 |
/var/log |
输出到指定目录的spring.log文件中 |
logging.file不指定路径在当前项目下生成springboot.log文件,也可以指定路径D:/springboot.log
logging.path指定为/spring/log就会在当前磁盘的根路径下创建一个spring文件夹和log文件夹,使用spring.log为日志文件。
5.使用自己的配置文件
如果使用logback配置文件,就吧logback.xml放在项目resources目录下即可,
1
2
3
4
5
6
7
8
9
10
11
12
13
14
15
16
17
18
19
20
21
22
23
24
25
26
27
28
29
30
31
32
33
34
35
36
37
38
39
40
41
42
43
44
45
46
47
48
49
50
51
52
53
54
55
56
57
58
59
60
61
62
63
64
65
66
67
68
69
70
71
72
73
74
75
76
77
78
79
80
81
82
83
84
|
<?xml version="1.0" encoding="UTF-8"?>
<configuration scan="false" scanPeriod="60 seconds" debug="false">
<property name="LOG_HOME" value="/app/log" />
<property name="appName" value="atguigu-springboot"></property>
<appender name="stdout" class="ch.qos.logback.core.ConsoleAppender">
<layout class="ch.qos.logback.classic.PatternLayout">
<pattern>%d{yyyy-MM-dd HH:mm:ss.SSS} [%thread] %-5level %logger{50} - %msg%n</pattern>
</layout>
</appender>
<appender name="appLogAppender" class="ch.qos.logback.core.rolling.RollingFileAppender">
<file>${LOG_HOME}/${appName}.log</file>
<rollingPolicy class="ch.qos.logback.core.rolling.TimeBasedRollingPolicy">
<fileNamePattern>${LOG_HOME}/${appName}-%d{yyyy-MM-dd}-%i.log</fileNamePattern>
<MaxHistory>365</MaxHistory>
<timeBasedFileNamingAndTriggeringPolicy class="ch.qos.logback.core.rolling.SizeAndTimeBasedFNATP">
<maxFileSize>100MB</maxFileSize>
</timeBasedFileNamingAndTriggeringPolicy>
</rollingPolicy>
<layout class="ch.qos.logback.classic.PatternLayout">
<pattern>%d{yyyy-MM-dd HH:mm:ss.SSS} [ %thread ] - [ %-5level ] [ %logger{50} : %line ] - %msg%n</pattern>
</layout>
</appender>
<logger name="com.atguigu" level="debug" />
<logger name="org.springframework" level="debug" additivity="false"></logger>
<root level="info">
<appender-ref ref="stdout" />
<appender-ref ref="appLogAppender" />
</root>
</configuration>
|
如果将logback.xml更改为logback-spring.xml就是有SpringBoot解析日志配置,就可以使用SpringBoot的Profile功能,指定在某种开发环境下才生效。
1
2
3
4
5
6
7
8
|
<layout class="ch.qos.logback.classic.PatternLayout">
            <springProfile name="dev">
                <pattern>%d{yyyy-MM-dd HH:mm:ss.SSS} ----> [%thread] ---> %-5level %logger{50} - %msg%n</pattern>
            </springProfile>
            <springProfile name="!dev">
                <pattern>%d{yyyy-MM-dd HH:mm:ss.SSS} ==== [%thread] ==== %-5level %logger{50} - %msg%n</pattern>
            </springProfile>
        </layout>
|


近期评论